Solar Browsing Rendering
This page describes how to set up and configure the solar browsing renderables in OpenSpace. For instructions on how to download and prepare the image data, see the Solar Browsing Data page.
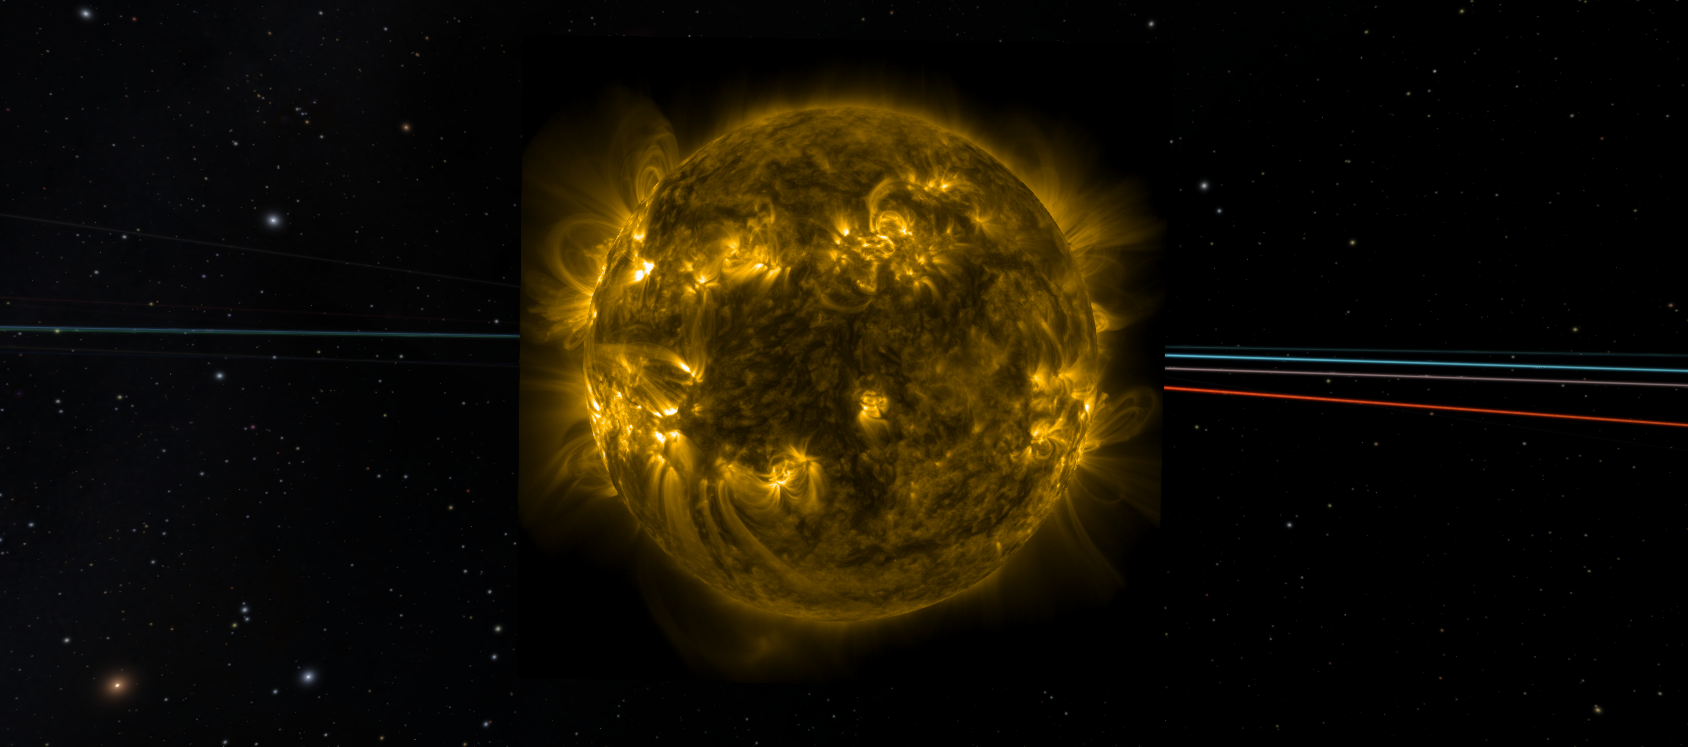
One example of the SDO AIA-171 instrument projected onto the solar surface using RenderableSolarImageryProjection, showing the Sun’s corona in extreme ultraviolet light.
There are two renderables involved in displaying solar imagery:
RenderableSolarImagery displays the images as a textured plane centred on the Sun and oriented perpendicular to the spacecraft’s viewing direction. One node is created per spacecraft.
RenderableSolarImageryProjection projects the images from one or more spacecraft onto a sphere centred on the Sun, allowing the imagery to be viewed from any direction in the scene. This renderable references the
RenderableSolarImagerynodes.
Usage
To use the solar browsing feature you first need to download image data using the HelioviewerDownloadTask, as described on the Solar Browsing Data page. Once data has been downloaded, the renderables can be set up using the assets described below. Ready-to-use example assets for SDO and STEREO are available in data/assets/scene/solarsystem/heliosphere/solarbrowsing, and can be used as a starting point or as a reference for setting up your own.
The solar browsing feature is designed for sequential playback of solar imagery over time. The system performs best when simulation time progresses continuously forward or backward, and has been tested at simulation speeds of around 12 to 14 hours per second. At this cadence, the frame prediction system has enough time to decode and cache upcoming images before they are needed.
Jumping to an arbitrary point in time is supported, but the images at the new time will need to be decoded before they can be displayed. On the first visit, this means reading and decoding the JP2 files and writing them to the image cache, which can take a moment depending on the number of images and the hardware available. Subsequent visits to the same point in time will load images from the cache and are significantly faster.
Tip
For the smoothest experience, use the time controls to play forward continuously rather than scrubbing or jumping to specific times. This gives the frame prediction system the best opportunity to stay ahead of the current frame.
RenderableSolarImagery
This Renderable loads time-sequenced solar observation images from a directory on disk and displays them as a 2D plane. The image plane is centred on the Sun and rotates to remain perpendicular to the direction towards the spacecraft. The displayed image updates automatically as the simulation time changes.
All instrument subdirectories under ImageDirectory are loaded automatically at startup. See the Directory Structure section on the data page for details on how the data should be organized on disk.
Minimal Asset
The minimal setup requires a scene graph node with an ImageDirectory pointing to the root folder containing the instrument subdirectories. The rotation of the image plane is derived from the position of the parent node, so the parent should track the spacecraft position.
local SolarImagery = {
  Identifier = "SolarImagery_SDO",
  Parent = "SDO_Position_Inertial",
  Renderable = {
    Type = "RenderableSolarImagery",
    ImageDirectory = openspace.absPath("${SYNC_DYNAMIC}/solarbrowsing/sdo")
  },
  GUI = {
    Name = "SDO Imagery",
    Path = "/Solar System/Solar Imagery"
  }
}
Limiting the Time Frame
Since the downloaded data only covers a specific time interval, it is good practice to restrict when the node is rendered to match that range. Outside of this interval the renderable will have no images to show, so limiting the time frame avoids the node being active unnecessarily. This is done by adding a TimeFrame to the node:
local SolarImagery = {
  Identifier = "SolarImagery_SDO",
  Parent = "SDO_Position_Inertial",
  TimeFrame = {
    Type = "TimeFrameInterval",
    Start = "2024-05-08T00:00:00",
    End = "2024-05-08T06:00:00"
  },
  Renderable = {
    Type = "RenderableSolarImagery",
    ImageDirectory = openspace.absPath("${SYNC_DYNAMIC}/solarbrowsing/sdo")
  }
  ...
}
Selecting the Starting Instrument
If multiple instruments are available in the image directory, the renderable will default to the first one found. To specify the instrument shown at startup, use the StartInstrument property:
...
Renderable = {
  Type = "RenderableSolarImagery",
  ImageDirectory = openspace.absPath("${SYNC_DYNAMIC}/solarbrowsing/sdo"),
  StartInstrument = "AIA-193"
}
...
The active instrument can also be changed at runtime through the GUI in the node’s properties panel.
Image Plane Rendering
The FaceMode property controls which sides of the image plane are rendered:
"Front Only"- renders only the side facing the spacecraft camera"Solid Back"(default) - the front side shows the image, the back side is rendered as a solid gray color"Double Sided"- renders the image texture on both sides of the plane
Downsampling
The DownsamplingLevel property controls the resolution at which the JP2 images are decoded. A value of 0 decodes at full resolution, while each step halves the resolution in both dimensions (so 1 gives half resolution, 2 gives quarter resolution, and so on). The default value is 2.
Reducing the downsampling level (increasing resolution) has several consequences. Decoding each image takes longer, which can affect how quickly new frames appear during playback. Decoded frames are also larger and take up more space in the image cache because each resolution level is stored as a separate cache file. In addition, overall memory usage increases. For most use cases, the default of 2 provides a good balance between visual quality and performance. Use 0 or 1 only when higher image detail is required and hardware allows for it.
Frame Prediction and Image Caching
Images are decoded asynchronously in the background to keep the simulation responsive. When the simulation time changes, the previous image remains visible until the new one is ready. To improve playback smoothness, the renderable pre-fetches a number of nearby frames based on the current playback direction. The number of frames pre-fetched before and after can be controlled via PredictFramesAfter and PredictFramesBefore.
If images are taking too long to appear after a time change, it can help to increase these values so that more frames are prepared in advance. However, requesting too many frames at once, particularly when jumping to a new point in time, can flood the decoding queue and temporarily reduce performance. The effect is most noticeable on the first visit to a time range, before any of the images have been written to cache.
The first time an image is displayed at a given resolution, it is decoded from the JP2 file and saved to a binary cache file. Subsequent loads of the same image use the cache, which is significantly faster. The cache is stored at:
OpenSpace/sync/dynamically_downloaded/solarbrowsing/cache/
  2024_05_06__12_13_31_814__SDO_AIA-193.bin
  2024_05_06__12_24_55_814__SDO_AIA-193.bin
  ...
Note
Each resolution level is cached as a separate file. If many images have been loaded at multiple downsampling levels, the cache folder can grow large. It is safe to delete the cache folder entirely as the files will be regenerated on next use.
Runtime Properties
The following additional properties are available in the GUI during runtime to help with navigating the data:
TimelineDataRange displays the earliest and latest available image timestamps for the currently active instrument. Note that data may not be continuously available across the entire displayed range, for example if images were downloaded for two separate periods with a gap in between.
JumpToStart performs a time jump to the earliest available image for the currently active instrument, which is a convenient way to begin playback from the beginning of the downloaded data.
RenderableSolarImageryProjection
This Renderable projects the images from one or more RenderableSolarImagery nodes onto a sphere slightly larger than the Sun, allowing the imagery to be viewed as if mapped onto the solar surface from any direction in the scene. Images from multiple spacecraft can be displayed simultaneously, up to a maximum of seven. Any part of the solar surface not covered by the projected imagery will appear gray, indicating that no data is available for that region.
A RenderableSolarImageryProjection asset and examples of RenderableSolarImagery assets for SDO and STEREO are available in data/assets/scene/solarsystem/heliosphere/solarbrowsing.
Asset
The RenderableSolarImageryProjection node is parented to the Sun and lists the identifiers of the RenderableSolarImagery nodes whose imagery should be projected. Each identifier must correspond to a scene graph node using a RenderableSolarImagery renderable. If two images overlap in the projection, the last entry in DependentNodes takes precedence in the overlapping region. Since SDO typically has the highest image resolution it is recommended to add it last in the list.
local SolarImageryProjection = {
  Identifier = "SunProjection",
  Parent = "SunIAU",
  Renderable = {
    Type = "RenderableSolarImageryProjection",
    DependentNodes = {
      "SolarImagery_STEREO_A",
      "SolarImagery_SDO"
    }
  },
  GUI = {
    Name = "Sun Projection",
    Path = "/Solar System/Solar Imagery"
  }
}